Quantcast
Channel: clock – Hackaday
Viewing all 491 articles
Browse latest View live

A Talking Clock For The 21st Century

$
0
0

The Talking Clock service is disappearing, and it’s quite possible that few of you will be aware of its passing. One of the staples of twentieth-century technology, the Talking Clock service was the only universally consumer-available source of accurate time information away from hourly radio time signals in the days before cheap radio-controlled clocks, or GPS. You’d dial (on a real dial, naturally!) a telephone number, to be greeted with a recorded voice telling you what the time would be at the following beep. Clocks were set, phone companies made a packet, and everybody was happy with their high-tech audio horology.

[Nick Sayer] used the USNO Master Clock telephone feed to see in the New Year, but had to make do with a voice from another time zone. It seems that there are no services remaining that provide one in Pacific time. His solution to the problem for a future year? Make his own Talking Clock, one that derives its time reference from GPS.

At its heart is a SkyTraq Venus838LPx miniature GPS module coupled to an ATMega32E5 microcontroller. The speech comes in the form of pre-recorded samples stored on an SD card. There is a small on-board amplifier to drive a single speaker. For extreme authenticity perhaps it could be attached to a GSM mobile phone module to provide a dial-up service, but he’s got everything he needs for a New Years Eve.

Want to hear what that that bit of nostalgia sounded like? Check out the quick clip below. As for modern replacements, we’ve had at least one talking clock here in the past, but not one using GPS.

GPS satellite image: NASA [Public domain].


The Noisiest Seven-Segment Display Ever

$
0
0

Few mechanical clocks are silent, and many find the sounds they make pleasant. But the stately ticking of an old grandfather clock or the soothing sound of a wind-up alarm clock on the nightstand are nothing compared to the clattering cacophony that awaits [ProtoG] when he finishes the clock that this electromechanical decimal to binary to hex converter and display will be part of.

Undertaken as proof of concept before committing to a full six digit clock build, we’d say [ProtoG] is hitting the mark. Yes, it’s loud, but the sound is glorious. The video below shows the display being put through its paces, and when the clock rate ramps up, the rhythmic pulsations of the relays driving the seven-segment flip displays is hypnotizing. The relays, one per segment of the Alfa Zeta flip displays, have DPDT contacts wired to flip a segment by reversing polarity. As a work in progress, [ProtoG] hasn’t shared many more details yet, but he promises to keep us up to date on the converter aspect of the circuit. Right now it just seems like a simple but noisy driver. We’ll be following this one with interest.

If you prefer your clocks quieter but still like funky displays, check out this mixed media circus-themed clock.

Smell That? It’s time.

$
0
0

Steampunk is beautiful. There is something about the exposed metal and primitive looking artifacts that visually appeal to the brain of a maker and engineer alike. Makers have been busy the last decade building clocks with this theme because hey, everyone needs a clock. [Fuselage] has put together a Steam Punk Clock that releases actual steam(actually steam oil smoke) for its hourly chime. How cool is that?

The clock is designed around the Conrad C-Control Unit (translated) which has the Motorola 68HC08 and [Fuselage] uses BASIC to write the routines for the system. Unlike a lot of steampunk clocks that use Nixie Tubes, this one uses 4 Numitron displays for the hours and minutes display. An analog dial panel display is employed for the seconds’ and is driven by a PWM signal. The absence of the RTC module was not obvious until we saw that the BOM includes a DCF77 receiver. For the uninitiated, DCF77 is a longwave time signal and standard-frequency radio station in Mainflingen, Germany. If you are anywhere within a 2000 km range of that location, you can pick up a 24-hr time signal for free which is excellent if you plan to make say… a radio clock.

The steam/smoke generator is a subproject of sorts. The custom machine is designed to have a separate oil reservoir and pump in addition to the actual generator so that the system does not run out of fuel as quickly. Clearly [Fuselage] did his homework which is explained in brief in his project logs. The final design has a brass tube as the main heating and also serves as the outlet chamber. The oil is pumped from under the heating filament in the brass tube, and excess fluid drains off back into the reservoir. A piece of nichrome wire serves as the filament that vaporizes the liquid to gaseous form. Sensors make sure of the oil levels in the reservoir as well as the steam tube. Servo motors and fans add the effect of the opening the exhaust rain cap, and a small LED helps illuminate the exhaust to complete the impression of real steam.

The project is a great example of a simple but effective implementation and for those who are wondering about Numitron Tubes, check out this tutorial on the subject. Of course, there is the Giant Electro-mechanical Clock for those looking at more sizable works of art.

Not Your Typical POV Clock

$
0
0

Persistence of vision displays are fun, and a natural for clocks, but they’re getting a little Nixie-ish, aren’t they? There are only so many ways to rotate LEDs and light them up, after all. But here’s something a little different: a POP, or “persistence of phosphorescence” clock.

[Chris Mitchell] turned the POV model around for this clock and made the LEDs stationary, built into the tower that holds the slowly rotated display disk. Printed from glow-in-the-dark PLA, the disk gets charged by the strip of UV LEDs as it spins, leaving behind a ghostly dot matrix impression of the time. The disk rotates on a stepper, and the clock runs on a Nano with an RTC. The characters almost completely fade out by the time they get back to the “write head” again, making an interesting visual effect. Check it out in the video after the break.

Our only quibble is the choice to print the disk rather than cut it from sheet stock. Seems like there has to be commercially available phosphorescent plastic, or even the glow-in-the-dark paper used for this faux LED scrolling sign. But if you’ve got glowy PLA, why not use it?

Mechanical Clocks that Never Need Winding

$
0
0

What is it about mechanical clocks? Maybe it’s the gears, or the soft tick-tocking that they make? Or maybe it’s the pursuit of implausible mechanical perfection. Combine mechanical clocks with “free” energy harvested from daily temperature and pressure variation, and we’re hooked.

Both the Beverly Clock, built by Arthur Beverly in 1864, and the Atmos series of clocks built between 1929 and 1939, run exclusively on the expansion and contraction of a volume of air (Beverly) or ethyl chloride (Atmos) over the day to wind up the clock via a ratchet. The Beverly Clock was apparently a one-off, and it’s still running today. And with over 500,000 Atmos clocks produced, there must be some out there.

Although we had never heard of it, this basic idea is really old. Clicking through Wikipedia (like you do!) got us to Cox’s Timepiece, which is powered by the movement of 68 kg of mecury under atmospheric pressure. It is currently not running, but housed in the Victoria and Albert Museum in London. Even older is a clock that we couldn’t find any info on that dates from 1620, invented by Cornelius Drebbel. Anyone know anything?

We’ve had energy harvesting on our mind lately, and the article on the Beverly Clock says that it gets 31 μWh over a day when the temperature swings by 3.3 °C. Put into microcontroller perspective, this is 0.39 μA at 3.3 V, so you’ll have to be pretty careful about your sleep modes, and an LED is out of the question. How amazing is it, then, that this can power a mechanical clock?

Thanks [Luke], [hex4def6], and [Wallace Owen] for tipping us off to these in the comment section!

Hacking a 30-year-old Russian VFD

$
0
0

Reddit user [InThePartsBin] found some VFDs (Vacuum Fluorescent Displays) on an old PCB on eBay. The Russian boards date from 1987 and have a bunch of through-hole resistors, transistors and a some mystery ICs, plastic wraps around the legs and the top of the tube is held steady by a rubber grommet (the tip itself goes through a hole in a board mounted perpendicular to the main board.) Being the curious kind of person we like, and seeing the boards weren’t too expensive, he bought some in order to play around with to see if he could bring them back to life.

After getting the VFDs lighting up and figuring out the circuitry on the back, [InThePartsBin] decided that a clock was the best thing to build out of it. It was decided that a specialized VFD driver chip was the easiest way to make the thing work, so a MAX6934 was ordered. To give the clock some brains, an ATmega328 was recruited and to keep time, [InThePartsBin] had some DS3231 real-time clock modules left over from a previous project, so they were recruited as well. A daughterboard was designed to sit on the back of the vintage board and hold the ‘328 and the VFD driver chip.

Once [InThePartsBin] soldered on the components it was time to fire it up and send 1’s to the driver to turn on all the segments on all the tubes. Success! The only thing that [InThePartsBin] has left to do is write the code for the clock, but all the segments and tubes are controllable now, so the hardware part is done. There are other VFD clock projects on the site: Check out this one, or this one, and bask in the beautiful steel-blue glow.

Via Reddit.

Neon Lamps Make For The Coolest Of Nixie Clocks

$
0
0

Revisiting old projects is always fun and this Nixie Clock by [pa3fwm] is just a classic. Instead of using transistors or microcontrollers, it uses neon lamps to clock and drive the Nixie Displays. The neon lamps themselves are the logic elements. Seriously, this masterpiece just oozes geekiness.

Inspired by the book “Electronic Counting Circuits” by J.B. Dance(ZIP), published in 1967, we covered the initial build a few years back. The fundamental concept of operation is similar to that of Neon Ring Counters. [Luc Small] has a write-up explaining the construction of such a device and some math associated with it. In this project, [pa3fwm] uses modern day neons that you find in indicators, so his circuit is also updated to compensate for the smaller difference in striking and maintaining voltages.

The original project was done in 2007 and has since undergone a few upgrades. [Pa3fwm] has modified the construction to make it wall mounted. Even though it’s not a precise timekeeper, the project itself is a keeper from its time. Check out the video below for a demonstration.

Feel inspired yet? Take a peek at the White Rabbit Nixie Clock and you are looking for a low voltage solution to powering Nixies then check out the 5-volt Nixie Power supply.

neonclock

It’s a Nixie! It’s a VFD! No, It’s a Custom LED Display in a Tube

$
0
0

Like the look of Nixies but they just seem a little overdone? Or perhaps you just don’t want the hassles of a high-voltage power supply? Then maybe these faux-Nixie LED “tube” displays will find a way into your next clock build.

For his 2018 Hackaday Prize entry, [bobricius] decided that what the world needs is a Nixie that’s not a Nixie. To that end, each display is formed by seven surface-mount LEDs soldered to a seven-segment shaped PCB and slipped into a glass tube. The LEDs are in 4014 packages so they’re only 4 millimeters long, but what they lack in size they make up for in brightness. We’re not sure if it’s a trick of the camera, but the LEDs certainly seem to put off a bluish glow that’s reminiscent of vacuum-fluorescent displays — it’s like a Nixie and a VFD all rolled up in one package.  The current case, which hides the clock circuitry on the lower part of the PCB, is just plastic, but this would look spiffy in a fine wooden case.

Could this be another Nixie tube killer that never was? Perhaps, but wherever it ends up, we like the look of it, and we’re glad it’s one of the early Hackaday Prize entries. Have you got something to enter in the greatest hardware competition on Earth? If not, get cracking!


Multi-Coloured LEDs Make For A Beautiful Colour Clock

$
0
0
This project is so pretty, it doesn't need a case!
This project is so pretty in its own right, it doesn’t need a case!

Clocks are a recurring feature among the projects we feature here on Hackaday, with several common themes emerging among them. We see traditional clocks with hands, digital clocks with all forms of display including the ubiquitous Nixie tube, and plenty of LED ring clocks. [Matt Evans]’s build is one of the final category, a particularly nice LED ring clock using wire-ended multi-colour LEDs. Other clocks produce an effect that looks good from across the room, but this one is also a work of beauty when examined in close-up.

Behind it all are four interlocking semicircular PCBs, an STM32F051C6T6 ARM Cortex M0 microcontroller which controls the clock, and a brace of driver chips. The different “hands” of the clock are expressed as different LED colours, and there is a variety of different colour and clock “hand” effects. An acrylic ring completes the effect, by covering the LEDs themselves. He’s put together a video of the clock in action, which you can see below the break.

We’ve covered more than one LED ring clock in our time, of which this 200-LED one was particularly impressive.

Persistence of Phosphorescence Clock Displays YouTube Stats Too

$
0
0

Looking for an eye-catching and unique way to display the time and date? Want the flexibility to add other critical information, like the number of YouTube subs you’ve got? Care to be able to read it from half a block away, at least at night? Then this scrolling glow-in-the-dark dot-matrix display could be right up your alley.

Building on his previous Morse code transcriber using a similar display, [Jan Derogee] took the concept and went big. The idea is to cover a PVC pipe with phosphorescent tape and rotate it past a row of 100 UV LEDs. The LEDs are turned on as the glow-in-the-dark surface passes over them, charging up a row of spots. The display is built up to two rows of 16 characters by the time it rotates into view, and the effect seems to last for quite a while. An ESP8266 takes care of driving the display and fetching NTP time and YouTube stats.

We’ve seen “persistence of phosphorescence” clocks before, but not as good looking and legible as this one. We like the approach, and we can’t help but think of other uses for glow-in-the-dark displays.

Marquee Display Uses Six Dozen Surplus VFD Tubes to Great Effect

$
0
0

The quest to repurpose surplus parts into new and interesting displays never ends, it seems. And the bigger the display, the better, with extra points for using some really obscure part, like these surplus Russian vacuum-fluorescent tubes turned into a marquee display.

As [tonyp7] freely admits, this is a pet project that’s just for the fun of it, made possible by the flood of surplus parts on the market these days. The VFD tubes are IV-25s, Russian tubes that can be had by the fistful for a song from the usual sources. The seven small elements in the tube were intended to make bar graph displays like VU meters, but [tonyp7] ganged up twelve side by side to make 84-pixel displays. The custom driver board for each matrix needs three of the old SN75518 driver chips, in 40-pin DIPs no less. A 3D-printed bracket holds the tubes and the board for each module; it looks like a clock is the goal, with six modules ganged together. But the marquee display shown below is great too, and we look forward to seeing the finished project.

From faux-Nixies made with LEDs to flip-segment displays driven by relay logic to giant seven-segment LEDs that can be 3D-printed, we really like the trend to unique displays. What are you dreaming up?

[via r/electronics]

Vw2qRZx

GuerillaClock Could Save This City Thousands

$
0
0

They say necessity is the mother of invention. But if the thing you need has already been invented but is extremely expensive, another mother of invention might be budget overruns. That was the case when [klinstifen]’s local government decided to put in countdown clocks at bus stops, at a whopping $25,000 per clock. Thinking that was a little extreme, he decided to build his own with a much smaller price tag.

The project uses a Raspberry Pi Zero W as its core, and a 16×32 RGB LED matrix for a display. Some of the work is done already, since the bus system has an API that is readily available for use. The Pi receives the information about bus schedules through this API and, based on its location, is able to determine the next bus arrival time and display it on the LED matrix. With the custom 3D printed enclosure and all of the other material, the cost of each clock is only $100, more than two orders of magnitude less expensive.

Hopefully the local government takes a hint from [klinstifen] and decides to use a more sane solution. In the meantime, you might be able to build your own mass transit clock that you can use inside your own house, rather than at the train station, if you’re someone who has a hard time getting to the bus stop on time.

Simple Home-built Projection Clock Projects Time

$
0
0

There are plenty of cheap projection clocks available, but as [Thomas Pototschnig] points out in this project, where’s the fun in just buying something? He set out to build a cheap projection clock using a small LCD screen, a cheap LED backlight, and a cheap lens. Cheap is the order of the day here, and [Thomas] succeeded admirably, creating a design that can be made with a couple of cheap PCBs, a 3D printer and the other parts mentioned above. He does a nice job of laying out his thinking in this design, showing how he calculated the projection path and made other decisions. His project has room to grow as well: it runs from an Arduino compatible STM32 that could handle many things other than showing the time if you were inclined to expand the project further.

[Thomas] has released all of the files he created for the project, including a number of options for the case that can use C-mount and Sony E-mount lenses. I’m not sure if you would want to attach your expensive camera lenses to a home-made projector like this, but it’s good to have the option if you have a dead E-mount lens that you were going to tear apart for parts anyway.

Hawkeye, the 3D-Printed Tourbillon Movement

$
0
0

As if building tiny mechanisms with dozens of moving parts that all need to mesh together perfectly to work weren’t enough, some clock and watchmakers like to put their horology on hard mode with tourbillon movements. Tourbillons add multiple axes to the typical gear trains in an attempt to eliminate errors caused by the influence of gravity — the movement essentially spins on gimbals while tick-tocking away.

It feels like tourbillons are too cool to lock inside timepieces meant for the ultra-rich. [Alduinien] agrees and democratized the mechanism with this 3D-printed tourbillon. Dubbed “Hawkeye,” [Alduinien]’s tourbillon is a masterpiece of 3D printing. Composed of over 70 pieces, the mechanism is mesmerizing to watch, almost like a three-axis mechanical gyroscope.

The tourbillon is designed to be powered either by the 3D-printed click spring or by a small electric motor. Intended mainly as a demonstration piece, [Alduinien]’s Thingiverse page still only has the files for the assembled mechanism, but he promises to get the files for the individual pieces posted soon. Amateur horologists, warm up your 3D-printers.

Tourbillons are no stranger to these pages, of course. We’ve done an in-depth look at tourbillons for watches, and we’ve even featured a 3D-printed tourbillon clock before. What we like about this one is that it encourages exploration of these remarkable instruments, and we’re looking forward to seeing what people do with this design. For those looking for more background on clock escapements in general, [Manuel] wrote a great article on how we turned repetitive motion into timekeeping.

Thanks for the tip, [Rob].

Linear Clock is a Different Way to Look at Time

$
0
0

There are usually two broad user interfaces for clocks. On the one hand you’ve got the dial clock, the default display for centuries, with its numbered face and spinning hands. The other mode is some form of digital clock, where the current time is displayed directly as alphanumeric characters. They’re both useful representations of time, but they both have their limits.

Here’s a third model — the linear clock. [Jan Derogee] came up with it thanks to the inspiration of somewhat dubious run-ins with other kinds of clocks; we feel like this introductory video was made with tongue firmly planted in cheek. Whatever the inspiration, we find this idea clever and well executed. The running gear of the clock is just a long piece of M6 threaded rod and a stepper motor. A pointer connected to a nut rides on the rod, moving as the stepper rotates it. There are scales flanking the vertical rod, with the morning hours going up the left side and afternoon hours coming down the right. The threaded rod rotates one way for twelve hours before switching to the other direction; when the rotation changes, the pointer automatically swivels to the right scale. For alarms, [Jan] has brass rods running along each scale that make contact with the pointer; when they encounter a sliding plastic insulator to break the contact, it triggers an alarm. An ESP8266 controls everything and plays the audio files for the alarm.

Unusual clocks seem to be a thing with [Jan]. His other builds include this neat phosphorescent clock and YouTube subs counter, which is sure to turn heads along with this clock.


Watch the Honeycomb Clock Gently Track Time

$
0
0

We love clocks here at Hackaday, and so does [John Whittington]. Last year he created this hexagonal honey clock (or “Honock”) by combining some RGB LEDs with a laser-cut frame to create a smooth time display that uses color and placement to display time with a simple and attractive system.

The outer ring of twelve hexagons is essentially the hour hand, similar to analog clock faces: twelve is up, three is directly to the right, six is straight down, and nine is to the left. The inner ring represents ten minutes per hex. Each time the inner ring fills, the next hex (hour) on the outer ring lights up. The whole display is flooded with a minute-long rainbow at noon and midnight. Watch it in action in the video, embedded below.

[John] also posted an imgur gallery for the Honock, with some good shots of the assembly. Unusual clocks are great ways to show off creativity within broad and simple functional constraints; take for example this robotic clock thats draws out the time on demand.

Tricking A Vintage Clock Chip Into Working On 50-Hz Power

$
0
0

Thanks to microcontrollers, RTC modules, and a plethora of cheap and interesting display options, digital clock projects have become pretty easy. Choose to base a clock build around a chip sporting a date code from the late 70s, though, and your build is bound to be more than run-of-the-mill.

This is the boat that [Fran Blanche] finds herself in with one of her ongoing projects. The chip in question is a Mostek MK50250 digital alarm clock chip, and her first hurdle was find a way to run the clock on 50 Hertz with North American 60-Hertz power. The reason for this is a lesson in the compromises engineers sometimes have to make during the design process, and how that sometimes leads to false assumptions. It seems that the Mostek designers assumed that a 24-hour display would only ever be needed in locales where the line frequency is 50 Hz. [Fran], however, wants military time at 60 Hz, so she came up with a circuit to fool the chip. It uses a 4017 decade counter to divide the 60-Hz signal by 10, and uses the 6-Hz output to turn on a transistor that pulls the 60-Hz output low for one pulse. The result is one dropped pulse out of every six, which gives the Mostek the 50-Hz signal it needs. Sure, the pulse chain is asymmetric, but the chip won’t care, and [Fran] gets the clock she wants. Pretty clever.

[Fran] has been teasing this clock build for a while, and we’re keen to see what it looks like. We hope she’ll be using these outsized not-quite-a-light-pipe LED displays or something similar.

A Crash Course In Reliable Communication

$
0
0

It’s probably fair to say that anyone reading these words understands conceptually how physically connected devices communicate with each other. In the most basic configuration, one wire establishes a common ground as a shared reference point and then the “signal” is sent over a second wire. But what actually is a signal, how do the devices stay synchronized, and what happens when a dodgy link causes some data to go missing?

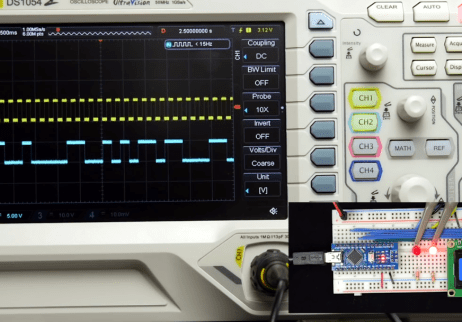
All of these questions, and more, are addressed by [Ben Eater] in his fascinating series on data transmission. He takes a very low-level approach to explaining the basics of communication, starting with the concept of non-return-to-zero encoding and working his way to a shared clock signal to make sure all of the devices in the network are in step. Most of us are familiar with the data and clock wires used in serial communications protocols like I2C, but rarely do you get to see such a clear and detailed explanation of how it all works.

He demonstrates the challenge of getting two independent devices to communicate, trying in vain to adjust the delays on the receiving and transmitting Arduinos to try to establish a reliable link at a leisurely five bits per second. But even at this digital snail’s pace, errors pop up within a few seconds. [Ben] goes on to show that the oscillators used in consumer electronics simply aren’t consistent enough between devices to stay synchronized for more than a few hundred bits. Until atomic clocks come standard on the Arduino, it’s just not an option.

[Ben] then explains the concept of a dedicated clock signal, and how it can be used to make sure the devices are in sync even if their local clocks drift around. As he shows, as long as the data signal and the clock signal are hitting at the same time, the actual timing doesn’t matter much. Even within the confines of this basic demo, some drift in the clock signal is observed, but it has no detrimental effect on communication.

In the next part of the series, [Ben] will tackle error correction techniques. Until then, you might want to check out the fantastic piece [Elliot Williams] put together on I2C.

[Thanks to George Graves for the tip.]

Watch The World Spin With The Earth Clock

$
0
0

With the June solstice right around the corner, it’s a perfect time to witness first hand the effects of Earth’s axial tilt on the day’s length above and beyond 60 degrees latitude. But if you can’t make it there, or otherwise prefer a more regular, less deprived sleep pattern, you can always resort to simulations to demonstrate the phenomenon. [SimonRob] for example built a clock with a real time rotating model of Earth to visualize its exposure to the sun over the year.

The daily rotating cycle, as well as Earth’s rotation within one year, are simulated with a hand painted plastic ball attached to a rotating axis and mounted on a rotating plate. The hand painting was done with a neat trick; placing printed slivers of an atlas inside the transparent orb to serve as guides. Movement for both axes are driven by a pair of stepper motors and a ring of LEDs in the same diameter as the Earth model is used to represent the Sun. You can of course wait a whole year to observe it all in real time, or then make use of a set of buttons that lets you fast forward and reverse time.

Earth’s rotation, and especially countering it, is a regular concept in astrophotography, so it’s a nice change of perspective to use it to look onto Earth itself from the outside. And who knows, if [SimonRob] ever feels like extending his clock with an aurora borealis simulation, he might find inspiration in this northern lights tracking light show.

This is a spectacular showpiece and a great project you can do with common tools already in your workshop. Once you’ve mastered earth, put on your machinists hat and give the solar system a try.

Clock This! A 3D-Printed Escapement Mechanism

$
0
0

Traditional mechanical clockmaking is an art that despite being almost the archetype of precision engineering skill, appears rarely in our world of hardware hackers. That’s because making a clock mechanism is hard, and it is for good reason that professional clockmakers serve a long apprenticeship to learn their craft.

Though crafting one by hand is no easy task, a clock escapement is a surprisingly simple mechanism. Simple enough in fact that one can be 3D-printed, and that is just what [j0z] has done with a model posted on Thingiverse.

The model is simply the escapement mechanism, so to make a full clock there would have to be added a geartrain and clock face drive mechanism. But given a pair of 608 skateboard wheel bearings and a suitable weight and string to provide a power source, its pendulum will happily swing and provide that all-important tick. We’ve posted his short video below the break, so if Nixie clocks aren’t enough for you then perhaps you’d like to take it as inspiration to go mechanical.

A pendulum escapement of this type is only one of many varieties that have been produced over the long history of clockmaking. Our colleague [Manuel Rodriguez-Achach] took a look at some of them back in 2016.

Viewing all 491 articles
Browse latest View live


<script src="https://jsc.adskeeper.com/r/s/rssing.com.1596347.js" async> </script>